This is a Walk-Through with accompanying Pictorial Tutorial, using the WW156 Fan Source
as a working example, on how to mask the Fan to make patterns to overlay the plain white fan with - and have the Asian script show through those patterns as well. The images were put together using Jasc Paint Shop Pro v9.
 |
| From special Tuts |
The accompanying .JPG Pictorials are numbered the same as each Step below, so that you can readily match them up with the Steps and follow along.
01 Step One |
| From special Tuts |
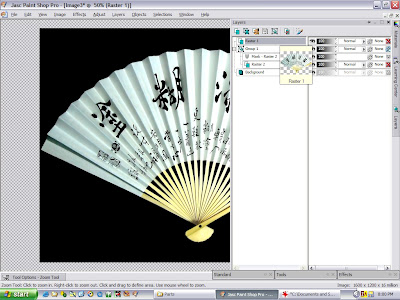
Use the Wand Tool to select the fan from the black background; settings: Tolerance = 20, Feather edge = 3 (in the pictorial, the Selection Marquée can be seen outlining the fan). Next, invert the Selection, then Modify the Selection: Contract = 2 pixels. This will pick up the Asian script right to the edges without leaving any white edging around them.
02 Step Two
 |
| From special Tuts |
Copy the selected image, and Paste as New Layer to a new Black canvas.
Make a Negative image of it (invert the colours), so that the script will stand out clearly against the now deep gray fan. Proceed to clean up white blemishes appearing all over the fan, and repair rough or broken edges and fan folds.
This also is a good stage at which to clean up noise: a light amount of Digital Camera Noise Removal (DCNR) if your software has that feature, JPeg Artifact Removal (JAR), and perhaps light doses of Edge/Text Preserving Smooth. I also cleaned up the image with a soft Clone brush ~ size=10 pixels, opacity=50%.
03 Step Three
 |
| From special Tuts |
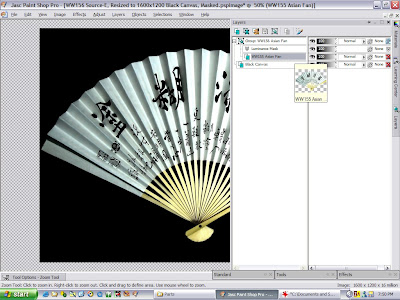
Once cleanup and Repair operations are done to satisfaction, take a Negative Image again to have the colours revert back to normal. Resize all layers to 1600x1200 wallpaper size, preparatory to creating a mask. Then make a new Mask Layer - from Image, and create mask from: Source Luminance. In PSP9, it will appear grouped with the WW155 Source Fan image; click the Mask icon in the Layer Palette to make the mask visible (in PSP7, make the mask visible from its Menus). Last, using the Layers Menu, save this mask to an Alpha Channel - and leave the image open (or the mask in the Alpha Channel won't be available).
04 Step Four
 |
| From special Tuts |
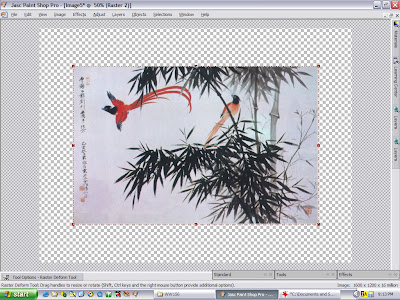
Open a new transparent canvas: set dimensions to 1600x1200. Next, open and copy a JPG image of choice (I used Chinese Paintings), and then Paste it to the new canvas. Select the Raster Deform Tool (Distortion Tool in PSP7).
05 Step Five
 |
| From special Tuts |
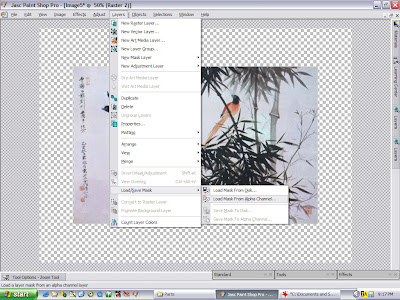
While this new image still has the focus, use the menus to load the Mask from the Alpha Channel, as illustrated in the pictorial.
06 Step Six
 |
| From special Tuts |
In the Load Mask From Alpha dialog, set the option to Show all mask (if it isn't already), and the Orientation: Fit to canvas ... that's why the WW156 Source Fan and the new Transparent canvas were both sized to exactly 1600x1200.
07 Step Seven
 |
| From special Tuts |
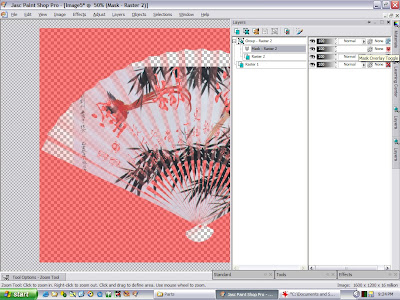
In the Layer Palette (use the Menus in PSP7 to do this), click the Mask Overlay Toggle to make the mask visible ... it turns pink in Paint Shop Pro. Then click on the Image layer that was pasted into the canvas earlier, and the Raster Deform Tool will select that layer.
08 Step Eight
 |
| From special Tuts |
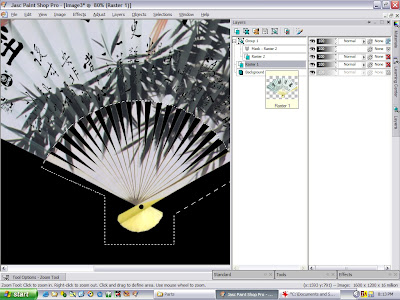
Use the Raster Deform Tool to enlarge, rotate and otherwise shape the image to completely fill the fan area above the fan blades ... it doesn't matter if the image lies partway inside the spoked wooden fan blades, just so long as it fills the area where the fan's white covering is. Also take care that the image is positioned under the mask in such a way that the mask doesn't crop off significant parts of the image. For example, in the accompanying pictorial, notice that most of the foliage is within the main area of the fan - above its blades/spokes, and that the wing on the bird in flight lies completely within the top edge of the fan. The outline made by the Deform Tool can also be seen stretched and tilted to one side to help position the image fully within the fan - it just misses the fan's corners, too.
09 Step Nine
 |
| From special Tuts |
In the Layer Palette, click on the entire Group as shown in the accompanying Pictorial - done in order to select both the image and the mask overlaying it; then Copy it (in PSP7: not sure, but I think the Menus are used to Select the Image from Mask - and then Copy it).
If this is at least the second time through this
tutorial, then skip down to Step Sixteen-B at the bottom of this tutorial.
10 Step Ten |
| From special Tuts |
Open a new Black Canvas set to 1600x1200, and then Paste the masked image onto it as a New Layer.
11 Step Eleven
 |
| From special Tuts |
Switch to the WW156 Source Fan, masked; in the Layer Palette, click on the WW156 Fan component of the Group to select it, as illustrated in the accompanying Pictorial; then Copy it.
12 Step Twelve
 |
| From special Tuts |
Switch back to the black canvas with the masked pattern that was just pasted into it, and Paste the WW156 Fan onto it as a New Layer.
13 Step Thirteen
| From special Tuts |
Using the Layer Palette, move the Pattern layer on top of the Fan layer. Zoom the images over where all edges are visible - over a piece of Script in the fan in the accompanying Pictorial, and line all the edges up to the pixel. Since both Fan Mask and Masked Decorative were made within 1600x1200 canvasses, the two images will overlay each other exactly - everywhere - so just one easy-to-check location is needed to line everything up correctly.
14 Step Fourteen
 |
| From special Tuts |
In the Layer Palette, click on the WW156 Source Fan layer ...
15 Step Fifteen
 |
| From special Tuts |
... then Drag & Drop it within the layer palette to lie directly above the Masked Decorative Image Group, as shown in the accompanying Pictorial.
16 Step Sixteen
 |
| From special Tuts |
Using the Point-to-Point Selection Tool set to a Feather Edge of 2 pixels and No Anti-Alias, click along just barely below (or outside) the edges where white fan covering meets wooden fan blades, and also up along the wooden end-blade on the right - as shown in the accompanying Pictorial. Once fully selected around to the upper-top end of the right blade, click out an area well away from the blades/spokes until the last click-point is adjacent to the start point but well away from the blades - as illustrated in the Pictorial. Then activate the Selection ... by right-clicking the image in Paint Shop Pro.
_______________________________________________
_______________________________________________
Once Step Sixteen is completed, you can save it at that stage: File > Save As… under a new file name, beginning with the word “Template…”
But first, Delete the decorative pattern layer before Saving As a Template, so that you don’t have to delete it later on when making a different patterned fan - you’ll have just the Source image and the Selection marquee to save, which is all you really need in the Template. Then Redo right away to put the pattern layer back the way it was.
The reason for this is that the Template can then be re-used to make more decorative fan coverings (call it "Template + optional title" to clearly identify it as re-usable).
To make different patterns for this same Fan, just repeat Steps Four through Nine inclusive, then jump directly to Step Sixteen-B below to carry on - and then pick up again at Step Seventeen …
Step Sixteen-B
There's no need to clip out the fan blades again, because that stage was saved to disk; so just switch to that Template - or re-open it if closed.
Immediately Save As… with a new filename - not the same file name, or the Template for the Fan Blade Selection will be lost. But even if that does happen: just
(a) Undo back to the Template stage
(b) Save As… the Template once again
(c) Save As… again before forgetting to - and give the file a different name, then
(d) Redo ahead to where you left off.
Then, from Step Nine, Paste the new Decoration image into this Template as a New Layer. Last, zoom the images and line up all edges to the pixel.
Now: go to Step Seventeen...
17 Step Seventeen
 |
| From special Tuts |
Within the layer palette, Drag & Drop the [WW156] Source layer to lie below the Decorative Layer Group, as shown is the accompanying Pictorial.
18 Step Eighteen
 |
| From special Tuts |
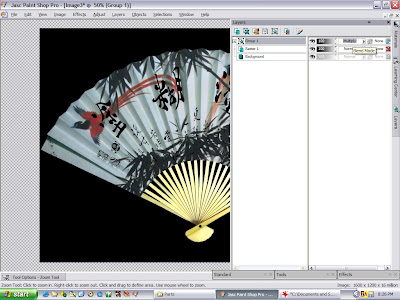
Again as shown in the accompanying Pictorial: using the Layer Palette, click on the Decoration layer to select it - the Decorative pattern, not the Mask layer.
19 Step Nineteen
| From special Tuts |
Either press the Delete key or (in Paint Shop Pro) use the Menu: Edit > Clear. Then portion of the Decorative Pattern within the selection area will disappear, allowing the fan blades to appear ... you now have a fan with a new Decorative covering, complete with complex Asian Script showing through just perfectly, to replace that plain old humdrum boring non-competitive white covering <whilst privately gloating snickering and snorting at the competition that didn't think of doing this>.
20 Step Twenty
 |
| From special Tuts |
Optional - if it needs it: in the Layer Palette, click on the Decorative Layer Group to select it, and then apply the Layer Blend Mode = Multiply. This will help deepen the shadows in the accordion folds in the fan covering.
21 Step Twenty-One
 |
| From special Tuts |
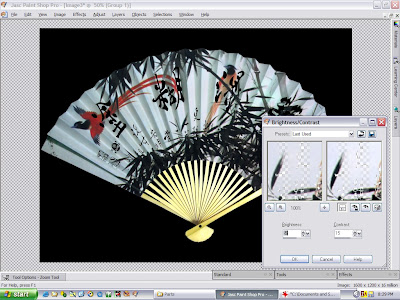
Optional - if it needs it: adjust Brightness and Contrast to enrich the colours and deepen the darker ones - and to help eliminate any "smoky haze" from the appearance of the Decorative Layer Group.
22 Step Twenty-Two
 |
| From special Tuts |
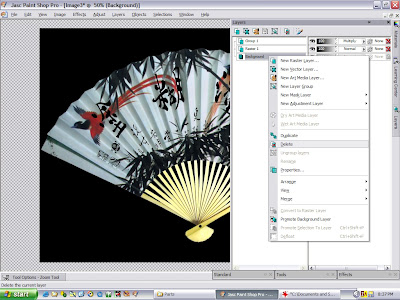
In the Layer Palette, select the Background canvas layer, and in Paint Shop Pro: right-click on it - and from the pop-up menu, click on: Delete ... to remove the Background layer.
23 Step Twenty-Three
 |
| From special Tuts |
In the Layer Palette (again in Paint Shop Pro): right-click on any layer, and from the pop-up menu: Merge - and then from the fly-out menu, click on: Merge Visible ... to combine all layers into a single layer against a transparent background.
The Decorative Fan is now ready to Save As a file
and to Paste as New Layer.
Although the WW156 Source - Asian Fan was used to
illustrate masking, this same Tutorial can be used
as a walk-through for any similar masking operation.
Addendum
24 Step Twenty-Four
 |
| From special Tuts |
To flip the colour of the Asian Script in the WW156 Source Fan to White Script:
Back in Step Seventeen, just before executing its Drag & Drop operation:
- (a) Invert the Selection - from fan blades to everything else but those blades
- (b) Invert the colours - make the fan a Negative Image
- (c) Invert the Selection - to once again select the fan blades
... and now the Asian Script is White instead of black. Cool!
25 Step Twenty-Five
 |
| From special Tuts |
This is simply a screenshot of Paint Shop Pro loaded with four patterned fans I made, and the WW156 Source Fan and its Mask (in red) used to stencil out / cookie-cutter out the Chinese Paintings to fit the fan.
The end result of building these fans brings this wee tutorial to a close:
WW156 Fred of Dee - Fanfare (Non-entry).jpg
 |
| From special Tuts |
Asleep yet?? Congratulations! if you read this far.
Wishing Well ... and may the Source be with you,
Fred of Dee
No comments:
Post a Comment